RabbitMQ configuration

All config file settings that start with rabbitmq-* control how MailerQ interacts with RabbitMQ. Amongst these settings are the address of the RabbitMQ server, the queue from which outgoing messages are read, and the queues to which incoming messages are delivered.

RabbitMQ address

MailerQ reads the location and authentication information to connect to RabbitMQ from its config file. This data is stored in the "rabbitmq-address" setting:

rabbitmq-address: amqp://login:passwd@hostname/vhost

The format of the address is obvious: the "login" and "passwd" hold the username and password of the RabbitMQ server, the hostname is the name of the server on which RabbitMQ runs, and the optional vhost is the name of the "virtual host" inside RabbitMQ that you have reserved for all MailerQ related data.

If you leave the "rabbitmq-address" setting empty, MailerQ uses the "amqp://guest:guest@localhost/" default value. This default only works if you run RabbitMQ and MailerQ on the same server, and when you do not use a special vhost.

If you have a cluster of RabbitMQ nodes, you can use commas to separate the addresses:

rabbitmq-address: amqp://guest:guest@host1/vhost,amqp://guest:guest@host2/vhost,amqp://guest:guest@host3/vhost

Running a cluster allows you to use highly available queues.

If your RabbitMQ server supports secure connections, you can configure MailerQ to connect to an "amqps://" address instead. The communication between MailerQ and RabbitMQ will then be encrypted.

rabbitmq-address: amqps://guest:guest@hostname/vhost
rabbitmq-verify:  false

MailerQ checks the server certificate when it connects to a secured RabbitMQ server. If this certificate can not be verified with one of the known openssl certificate authorities, MailerQ refuses to set up a connection. If you use a self-signed certificate, you may want to skip this extra test, and set the config file option "rabbitmq-verify" to "false".

RabbitMQ queues

MailerQ uses several queues to manage email messages. All mails that flow through MailerQ are picked up from and published back to specific queues in RabbitMQ. The names of these queues are set in the config file. On startup, MailerQ reads this configuration and tells RabbitMQ to create the listed queues. This means that you do not have to ensure that the queues exists before you start up MailerQ: the queues are automatically created.

rabbitmq-outbox:        <Name of your outbox message queue>
rabbitmq-inbox:         <Name of your inbox queue>
rabbitmq-reports:       <Name of your reports queue>
rabbitmq-local:         <Name of your local queue>
rabbitmq-refused:       <Name of your refused queue>
rabbitmq-dsn:           <Name of your delivery status notification queue>
rabbitmq-results:       <Name of your result queue>
rabbitmq-success:       <Name of your success queue>
rabbitmq-failure:       <Name of your failure queue>
rabbitmq-retry:         <Name of your retry queue>

The messages published to these queues are always in JSON format, and hold the meta information for each delivery: the envelope, recipient and other message specific settings.

Queue for outgoing messages

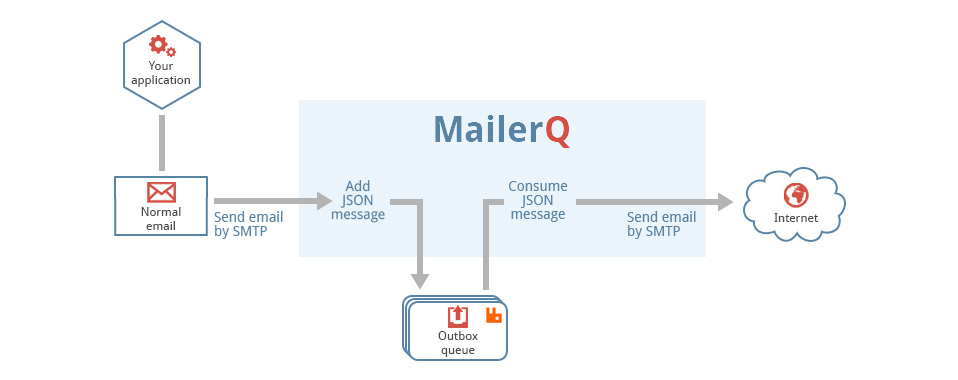
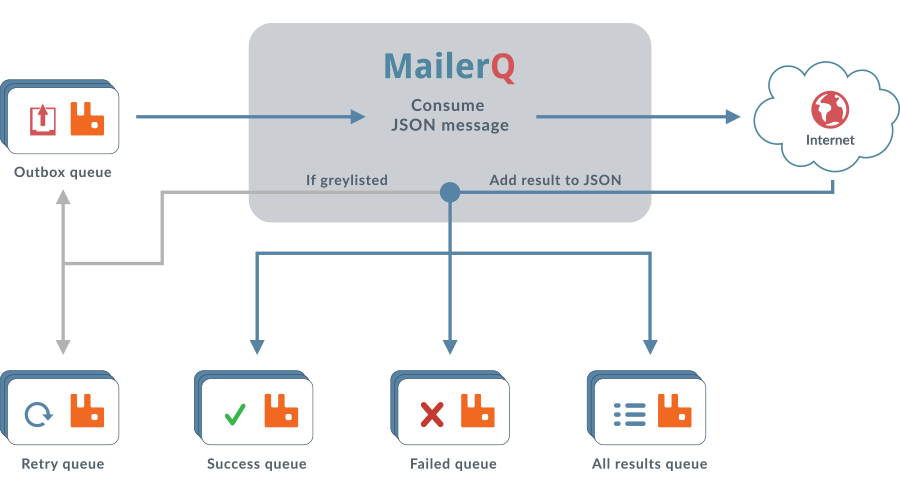
All emails that MailerQ is going to send out are fetched from the outbox queue. The outbox queue feeds MailerQ with messages to be delivered. The name of this queue can be set with the "rabbitmq-outbox" setting in the config file. The default value is "outbox".

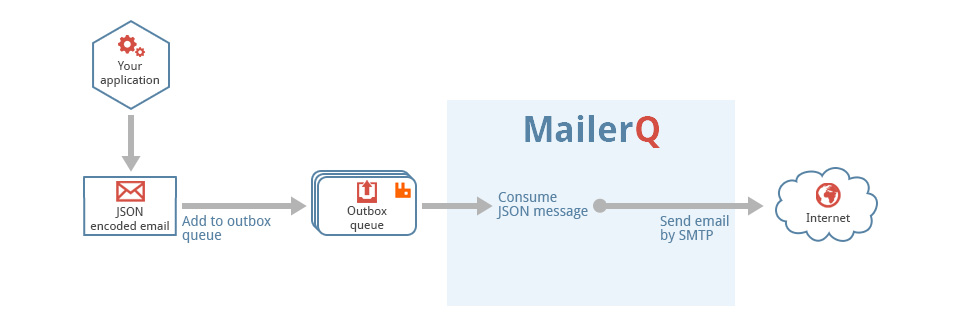
The outbox queue is the only queue from which messages are read. If you want to inject outgoing email messages directly into RabbitMQ, you should therefore publish your messages to this outbox queue so that MailerQ automatically picks them up and delivers them.

Watch out if you run multiple MailerQ instances. If the individual instances all send out mail from different IP addresses (because they run on different servers), it is better to use a different outbox queue for every instance. Every MailerQ instance consumes messages from its own queue. You must then also ensure that you publish messages to the right queue to have them being sent from the right server. If you've set up a MailerQ cluster, messages are automatically moved to the correct queue if they end up in a wrong outbox queue.

Queues for incoming messages

The queues other than the outbox queue are used by MailerQ to write data to. These are for example queues to which the results are written, and queues that are used for incoming messages. Incoming messages for example come from the MailerQ SMTP port or are the messages that are dropped in the spool directory.

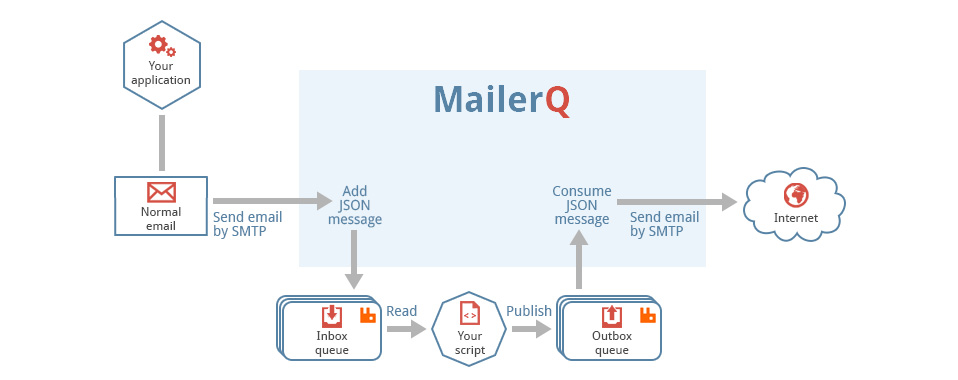
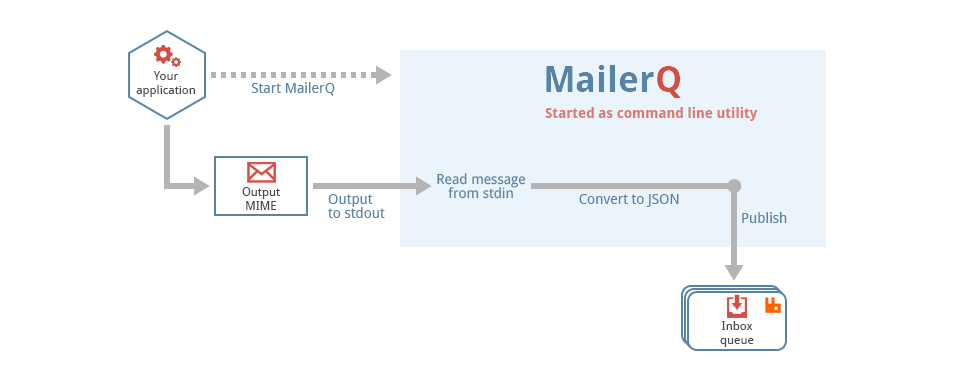
Messages that are received by MailerQ via one of the injection mechanisms are converted into JSON format and published to message queues. The "rabbitmq-inbox" setting specifies the default queue for these incoming messages, but other queues are used as well.

rabbitmq-inbox:     inbox
rabbitmq-local:     local
rabbitmq-reports:   reports
rabbitmq-refused:   refused

By default rabbitmq-inbox is set to "outbox", so all incoming messages are automatically published to the "outbox" queue. This means that all incoming messages are automatically relayed. You can set the "inbox" queue to a separate queue, if you for want to process the incoming messages in a different way. Leaving this "inbox" queue empty discards received messages that are not recognized as reports or messages for local email addresses.

The "refused", "reports" and "local" settings are optional too. If you leave them empty, MailerQ simply publishes all incoming message to the inbox queue (or to the outbox queue if no inbox was set). But if you do configure one or more of these queues, MailerQ analyzes each incoming message to see if it should be published to the normal inbox, or to one of the other queues instead.

MailerQ internally keeps a list of "local" email addresses. This list can be edited via the management console. If you have configured a "local" message queue, and a mail comes in for an address that is on that list, the message will not be dropped in a the "inbox" queue, but in the "local" queue instead.

If the local email turns out to be not a normal type of email, but some kind of delivery report (or some other kind of report), the message is not even placed in the "inbox" queue but goes to the "reports" queue instead. To summarize:

The last queue to mention is the "refused" queue. It is used for messages that were not accepted. For example, if you configure MailerQ to listen to one or more SMTP ports, and you require incoming connections to be authenticated, you might receive messages over unauthenticated connections. These messages are rejected and do not end up in the "inbox" queue. However, for debugging and/or security reasons you might still want to find out who is flooding your SMTP server. By assigning a value to "rabbitmq-refused", you instruct MailerQ to send rejected messages to a special queue where you can inspect these refused messages. The default setting for "rabbitmq-refused" is empty, so that refused messages are not collected.

Be careful here: the queue with refused messages does not automatically get emptied, and can fill up fast in case of an attack. MailerQ only adds messages to it, and it is up to you to periodically check the contents of the queue and empty it, or to set a max length and/or max age for messages in the queue (you can use RabbitMQ's web based management console to set such limits).

Delivery status notifications

In the above sections we described the queue from which MailerQ reads its outgoing messages (the outbox queue) and the queues to which all incoming messages are published. However, besides handling incoming and outgoing messages, MailerQ can also construct and send email messages all by itself: delivery status notifications (DSN).

A delivery status notification is an email message that is sent back to the original envelope address when a delivery fails (technically, it is also possible to send such notifications on successful delivery and when a message gets delayed, but in practice it is mostly used for failure notifcations). By default MailerQ does not send such notifications because MailerQ uses result queues and JSON to report back the delivery results. However, if you add a "dsn" property to the JSON of an outgoing message, you can instruct MailerQ to send delivery status notifications too.

Technically, a delivery status notification is a regular email, and MailerQ simply posts a message to the outbox queue when such an email has to be delivered. If you want to use a different queue than the outbox queue, you can use the "rabbitmq-dsn" property.

rabbitmq-dsn: alternative_dsn_queue

The "rabbitmq-dsn" setting is normally used if you want to preprocess delivery reports before they are sent. By setting the "rabbitmq-dsn" value to a custom queue, a custom script can pick up the notifications, preprocess them and put them in the "outbox" queue.

Result queues

When a message gets delivered or when a delivery fails, the delivery result is published to one or more of the result queues, to allow external monitor scripts to keep an eye on the deliveries.

rabbitmq-results: completed_deliveries
rabbitmq-success: successful_deliveries
rabbitmq-failure: failed_deliveries
rabbitmq-retry: delayed_deliveries

The "rabbitmq-results", "rabbitmq-success" and "rabbitmq-failure" settings hold the names of the RabbitMQ result queues. MailerQ posts a JSON result object for every successful delivery to the success queue, and for all failed deliveries to the failure queue. This same result object is also sent to the results queue. Every result object is thus published to two queues: failures are posted to the results queue and the failure queue, while successes are published to the results and success queues.

MailerQ only considers a delivery to be a failure when no new delivery attempts get scheduled. When a message cannot immediately be delivered, or when it is greylisted and will be retried, it is published back to the outbox queue, and not to the results and/or failure queues.

If you want to process the intermediate results (like greylisting reports) too, you can use a retry queue by setting the "rabbitmq-retry" config setting. All deliveries that failed, but that are published back to the outbox, are also posted to this retry queue.

If you're not interested in the results, or when you're only interested in specific results (like failures), you can set one or more of the result queues to empty strings. MailerQ will then not publish messages to them.

Priority queues

RabbitMQ supports priority queues. If you use a priority queue for the outbox, messages with a higher priority are consumed by MailerQ before messages with a lower priority, and are therefore also sent out faster. This could be useful if you want to inject messages that should be sent before emails already queued.

To turn a queue into a priority queue, the queue in RabbitMQ must have been declared with the "x-max-priority" property set. If you declare your own queues, you have to do this yourself. If you rely on MailerQ to declare the queues, you can specify the value of this property in the config file:

rabbitmq-maxpriority: 4

The above config file option instructs MailerQ to set the "x-max-priority" property on the queues it creates. This setting is used during application startup when the queues are declared, and when new temporary queues are declared. If queues already exist, they must match the "x-max-priority" setting of the existing queues.

The reason MailerQ declares all queues to be priority queues is so that messages that are higher priority can be picked up sooner in every part of the chain, also its reports and its results. The same holds for messages that are injected, as they can also have a priority setting set, allowing for injected messages also to be picked up sooner.

In general, this number should be kept as small as possible, as there is a significant overhead for priority queues. For example, when a priority queue is created with an "x-max-priority" of 4, RabbitMQ internally creates 4 queues. As this happens for every queue MailerQ declares, priority queues with more than two or three priority levels are generally discouraged.

The exchange

The "rabbitmq-exchange" variable holds the name of the RabbitMQ exchange
that MailerQ uses to publish all messages to. If not explicitly set, MailerQ uses the default exchange with an empty name. For most setups, this empty default exchange is good enough, because messages end up in the right queue anyway.

However, if you want to use a custom exchange, the "rabbitmq-exchange" setting allows you to do so. The exchange that you assign to this variable does not have to be created by yourself, because MailerQ automatically creates it on startup.

rabbitmq-exchange: your_exchange

To understand why you would need a custom exchange, you need a litte more inside knowledge of RabbitMQ. Although we constantly write that MailerQ publishes message to specific queues, this is not exactly how RabbitMQ internally works. RabbitMQ does not allow messages to be published directly to message queues. Instead, it wants messages to be published to an exchange. The exchange then forwards the messages to zero or more queues that are bound to it based on the routing key associated with the message. Therefore, when we write that "MailerQ publishes a message to the inbox queue", we actually mean that "MailerQ publishes a message to the exchange, and uses the name of the inbox queue as the routing key so that the message ends up in the inbox queue." In the end, the result is the same.

This exchange-routingkey-queue architecture can be pretty powerful. It for example allows you to create your own (temporary) queue and bind it to the same exchange as the outbox queue so that a copy of each message that goes to the outbox queue ends up in your private queue too. This allows you to monitor exactly what is passing through RabbitMQ, without interfering with the message flow. Great for monitoring and debugging!

To use the flexibility that RabbitMQ offers, you can use the "rabbitmq-exchange" setting to assign a custom exchange. If you leave the setting empty however, the messages still end up in the right queues.

Disable startup declarations

All queues and the exchange are automatically created when MailerQ starts. If you do not want MailerQ to declare the queues and exchanges, you can use the "rabbitmq-declare" setting in the config file. If you set this to false, no queues or exchanges are declared on startup.

rabbitmq-declare: false

Disabling the declaration of queues and exchanges is helpful if you have already created them yourself and you do not want MailerQ to do this for you. If you have created the queues with slightly different settings than MailerQ does, you even need this setting because otherwise MailerQ reports a queue incompatibility error and refuses to start.

Persistent and durable settings

In the MailerQ configuration you can specify whether you want queues to be durable and whether you want messages to be persistent using the following two options:

rabbitmq-durable:       true    (default: true)
rabbitmq-persistent:    false   (default: false)
rabbitmq-lazy:          false   (default: false)

MailerQ creates several queues and exchanges in RabbitMQ. When MailerQ starts, it first checks if the queues and exchanges that you have configured in the MailerQ config file exist. If they do not, MailerQ sends instructions to RabbitMQ to create the required exchanges and queues. RabbitMQ allows you to mark your queues and exchanges to be "durable". This means that the exchange or queue will continue to exist even when RabbitMQ is restarted. In theory it is a slightly better to enable durable queues (but you probably won't notice much of a difference because the queues and exchanges are automatically re-created on startup anyway).

The "rabbitmq-persistent" setting toggles whether messages published to RabbitMQ should be cached in main memory or on disk. With the default "false" setting, RabbitMQ keeps messages only in main memory and not on disk. This is much, much faster than storing the messages to disk. It does however bring a higher risk, because if RabbitMQ crashes, the messages will be lost. Turning on persistency will mean your messages are also saved to disk, and can survive a RabbitMQ crash. But at the same time it makes things much slower. We therefore recommend leaving the "rabbitmq-persistent" option off (set to "false"). Note that if you do turn it on, durable queues should also be turned on. Persistent messages are still lost if the queue is not durable, because the queue no longer exists.

The "rabbitmq-lazy" setting toggles whether queues are declared as lazy queues. Lazy queues ensure that messages are always written to disk. This lowers overall performance, but prevents sudden performance drops once RabbitMQ needs to flush to disk, giving predictable performance. See the RabbitMQ documentation for more information on lazy queues.

Multiple threads

MailerQ opens a number of different connections to RabbitMQ, and each connection runs in its own thread. There are separate threads for consuming from the inbox queue and threads for publishing messages to the result queues and/or back to the outbox queue.

You can specify in the config file that you want to start up multiple consumer and/or multiple publisher threads. If you notice that the consumer of publisher threads are CPU bound, you can configure MailerQ to start up more threads.

rabbitmq-consumers:     1 (default: 1)
rabbitmq-publishers:    1 (default: 1)

By adding the "rabbitmq-consumers" and "rabbitmq-publishers" variables to the config file, you instruct MailerQ to start up more consumer and/or publisher threads.

Compression

The data stream between RabbitMQ and MailerQ can be large. It can even be that big that it takes up a significant portion of the capacity of your internal network. To reduce the load on the network, MailerQ supports gzip compression.

MailerQ normally expects messages from RabbitMQ to be JSON encoded. However, if the AMQP envelope in which the message is wrapped has the "content-encoding" property set to "gzip", MailerQ expects the message to be a gzip compressed JSON object instead. It first decompresses the message, then it parses the JSON. This means that you can publish both normal JSON encoded messages to RabbitMQ, as well as gzip compressed data. If you compress your input JSON, you do have to make sure that you also set the "content-encoding" header in the AMQP envelope that is published to RabbitMQ.

MailerQ not only consumes messages from RabbitMQ, it also publishes messages back to it, like the results that are sent to the result queues or the retries that are published back to the outbox queue. By default, MailerQ only sends pure JSON to RabbitMQ, without compressing it, even if you used compression yourself when you published the message to the outbox. If you want MailerQ to compress the data too, you can use a special setting in the config file.

rabbitmq-encoding:      gzip

The above setting only affects how MailerQ publishes messages to RabbitMQ. Messages consumed from RabbitMQ can still both be compressed or not, because MailerQ always inspects the "content-encoding" header from the AMQP envelope.

Quality of Service

When consuming from the outbox queue, or flushing a queue, MailerQ loads a certain number of messages at the same time, also called QoS. These numbers can be tweaked to lower memory usage.

rabbitmq-qos:         1000    (default: 1000)
rabbitmq-flush-qos:   1000    (default: 1000)
rabbitmq-minqos:      100     (default: 100)

This number is interpreted per consumer thread. Therefore, the maximum total number of messages from the outbox that are in memory at the same time is the amount of consumers multiplied by the maximum number of messages. For example, if "rabbitmq-consumers" is set to 5, and "rabbitmq-qos" is set to 200, the maximum total number of unacknowledged messages from the outbox queue is 1000.

The "rabbitmq-flush-qos" can be set to lower the loaded messages when a flush happens. Although MailerQ doesn't load in the messages, their bodies will be sent over TCP and so the TCP buffer may be fully populated with all this data. As this can happen for anything that is unpaused or resumes sending, a lot may be flushed at once.

"rabbitmq-minqos" is the lower bound for the QoS when MailerQ decides to scale back for performance reasons. The QoS will never go below this number, unless there aren't enought messages to reach it.

Throttle

To ensure messages are not lost, MailerQ uses publisher confirms by default. This makes sure that messages are not acknowledged before RabbitMQ has accepted responsibility for it. This will inherently tie it to the quality of service settings. However, to further tweak performance, a throttle can be set. This throttle makes sure that only a certain number of messages are actually sent over the socket. The advantage of this is that it reduces the load on RabbitMQ, and keeps the socket open to bidirectional communication. It used to be the case that MailerQ could not adequately respond to flow control by RabbitMQ, eventually causing TCP backpressure, shutting down communication.

rabbitmq-throttle:      100     (default: 100)